Showing posts with label Altered Items. Show all posts

2/28/2013

A Year In A Book and Printing Photos

Photobucket

I have been feeling under the weather today (nauseous) and while I'm taking it easy, I thought I should finally print my photos for the Jan and Feb chapters (Year in a Book Project). I Printed a lot of different sizes, so I can fit in more pics. As I started printing out the photos, I realized how much I use my camera... on a daily basis. 

Tomorrow I'll share the January chapter and on Monday I'll share how I decorated the cover. It's all starting to come together and I'm thrilled with how it looks!
I hope you are doing what you love today.
~H

Pin It!

1/07/2013

How to make a Cute Standee

Photobucket


All of my CHA booth projects are coming along fine and dandy and today while making this, I had a thought... "Hey, you should share Mr. Mailman on the blog". This handsome fella is on one of my tag papers and was doodled by my brilliant friend for my Special Delivery collection. I wanted him to make a presence at the show, so I turned him into a standee. He was super easy and cheap to make.
Photobucket
I first printed him out on photo paper and cut him out. I pulled these supplies and traced him onto the foam core board. Cut him out (leaving a half circle for his stand) and adhered the photo to the board.

Photobucket

Photobucket

Photobucket

Photobucket
Using the scraps of the foam core board, I created the legs for the stand and super glued them in place. When I was all done, I was so pleased with myself! This could be so cute for your kids on the first day of school. I'm going to do one of me and put it in their back packs with a note. Or this could be neat for birthdays and a cut out of the birthday boy... or girl. You could do one of your pet... or your man ;)
Photobucket

Photobucket
The possibilities are endless! If you make one, do share it here. I'd love to see what you make.

Pin It!

1/05/2013

A Year In A Book Class - May

Photobucket

I really love this month, because I get to enjoy my Mother's Day gifts AND Mr. Sonboul and I celebrate our anniversary. I know that most people fall out of love after 10 years, but for us... it just keeps getting better and better. I miss him when he is away and he makes me giggle at the weirdest things.

Photobucket

I used THIS die cut and THIS banner for the cover.

Photobucket

Hello again... you've seen this before.

Photobucket

I plan to use this for our date night (on our anniversary). You can find it HERE and I backed it with a blue cardstock "tag page".

Photobucket

The back of it is matted, with rounded corners.

Photobucket

Two simple tags.

Photobucket

A cute tag that you can find HERE. I also backed it on a white tag page.

Photobucket

I love this page. Something so cool and simple about the letters coming off the pages. You can find it HERE
Photobucket
I added a darling little pocket and tag...which can be found HERE

Photobucket

All together I counted 31 spots and I plan to do word strips for the journaling this month.

Photobucket

See you all tomorrow and Happy Friday.

Pin It!

1/03/2013

Pom Pom Banner Anyone?

Photobucket
I have always LOVED pom poms! I can remember watching mom and having her teach me how to make them. Their soft and fuzzy feel...is oh so fun! Being that CHA winter setup is less than a week away, I've been uber busy designing projects for my booth space. I determined that a pom pom banner would be a splendid look for SunKiss. I headed to Joann's and found yarn that matched this paper. I was so trilled to find all the colors I needed and got started on it the moment I walked in the door. By 3am I was COVERED in yarn fuzz and had a show box packed with charming little pom poms.
Photobucket
Photobucket
The steps are so simple. To see how to make the pom poms, you can visit my bosom buddies blog.
Once you've got your shoe box full of pom poms, grab some twine. Simply do an overhand knot and put the pom pom in the middle. Pull the knot tight and fluff the ball. I told you it was easy! Later next week, I'll show you how I used them in my booth space.
Photobucket

Pin It!

Year In A Book Class - April

Well Hello Thursday and friends!
It's safe to say that I feel like a little bee. I've been so busy buzzing all around town this week. CHA is near and my check list is packed with cute crafting projects. Just to name a few... I've got to paint a vintage hutch mint green, finish up some layouts for my collections and paint some metal cans. While I'm up to my ear's with paper and paint, I hope you'll enjoy today's class for the month of April.

Photobucket

This year Easter is on March 31st, but I plain to add it in my book on the 1st of April. I picked a sunny yellow, pure white, hot pink, a peachy orange, a touch of green and tan.

Photobucket

I'm getting better with my Silhouette, because of THIS video. I learned how to weld images together. So I used a pretty font for my month and a bold number within a circle.

Photobucket

You've seen this page before, but this time I added a little bunny. Which you can find HERE

Photobucket

This was a card "diecut" and I turned it into a page. I back it with a pop of color and you can find the card here HERE

Photobucket

This page has another pop of color and you can find the die cuts HERE and HERE

Photobucket

Photobucket

I love POCKETS and putting a tag in them. THIS paper is from my Oh Happy Day Collection and I added a small hand cut bow tie to the bunny in the circle.

Photobucket

I used a texture piece of cardstock to cut out THIS and backed it on orange cardstock.

Photobucket

And here are the whole team of papers together. Bright and cheery, just like spring. Making this month made me long for spring and a visit from the Easter Bunny :)

Photobucket

Here are the back's of the pages. I counted 36 spots for photos and Journaling.

Photobucket

I'm digging all the layers so far and I can't wait to add in the photos.
How about you? How is your book coming along?

And don't forget to follow me through Google. It will let you know when each classes posts :)
It's over to the right.

Pin It!

12/29/2012

A Year In A Book Class - March

Photobucket

Good day to you and welcome back!
Today in class we will be discussing March. When thinking of March... I think green, but I'm not personally big on St. Patty's Day. I decided to still use green, but I used lighter tones and blue. Oh and plus some more glitter, just because I love glitter. The Cover can be found HERE and I backed it with a nice robin's egg blue. Again, I'm keeping the cover's look clean and modern.

Photobucket
On the back side of the cover, you'll find two cute mini pockets. This will serve for March 1st and 2nd. I created two little tags in each pocket and added an eyelet with twine to the teal tag.

Photobucket
I fell in love with THESE square week tags and placed them on both 9X4 inch sheets.

Photobucket Photobucket
On the back of the 2nd sheet, I made a larger white tag and placed it over the Saturday tag. That's mainly because we always do more on Saturdays :)

Photobucket
You've seen this page before and you can see the full thing HERE
Photobucket

For the last two pages, I created a matted look and rounded the edges. To make it even cuter I added in a tiny envelope and a tiny tag.
Photobucket
Photobucket
Photobucket Photobucket

All together I count 31 photo spots and if I need more space I'll most likely add in a pocket for keepsakes. So, do you like St. Patrick's Day? I guess if you do, you could add in something like THIS. Tomorrow I'll be back with April and I'll show how I made the large pocket. Again, it's super easy to make. Once you make one, you'll master it.
~H


Pin It!

12/27/2012

A Year In A Book Class - February

Photobucket
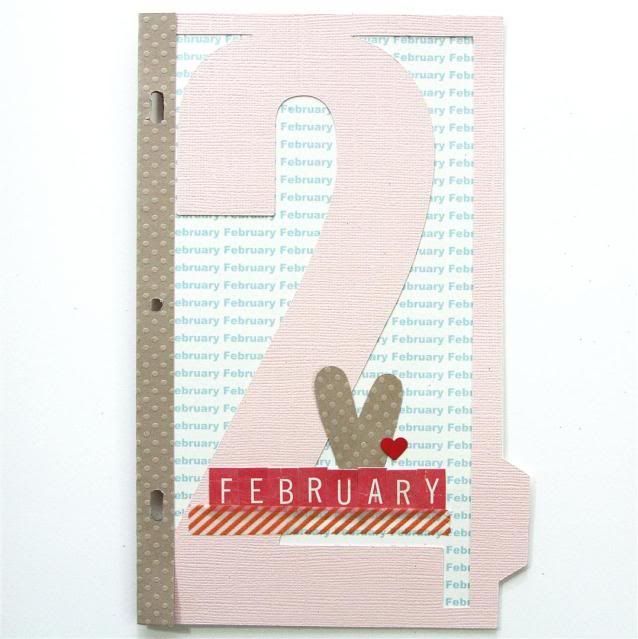
At the crack of dawn I took apart our Christmas tree... being that we've had it for a month now and it's becoming a fire hazard. I carefully packed up each ornament and tucked the bin away for next year. Doing this book makes me feel so prepared for fun new adventures that my little family will take. Just me and the boys. Now let's get down to the nitty gritty and talk about February. I decided that a soft pink, coral, baby blue, and orange were a perfect color combo for love and romance. I hope to go on a lot of dates this month, with Mr. Sonboul and the boys ;) Hey maybe even a BFF date.
Photobucket
I wanted to do something different for the cover, so I found THIS delectable two divider. I wanted something special behind it, so I used word and printed up a sheet that said "February" over and over again. Oh and I made the text a baby blue color. I also pulled these cute stickers and tape.
Photobucket
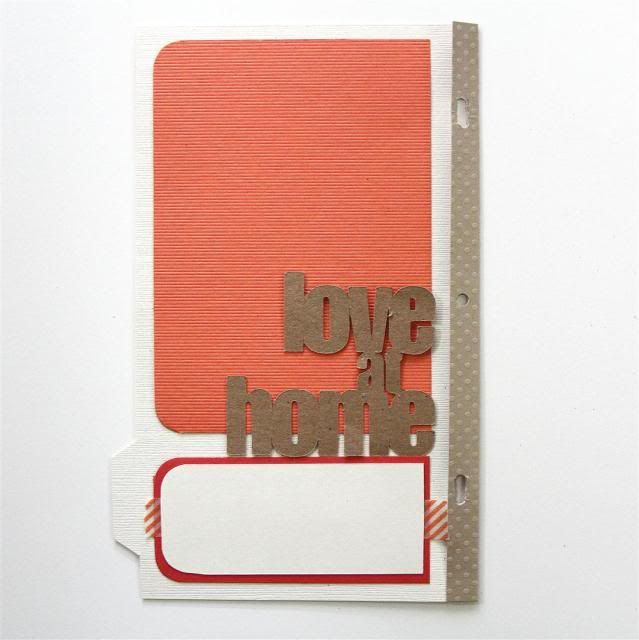
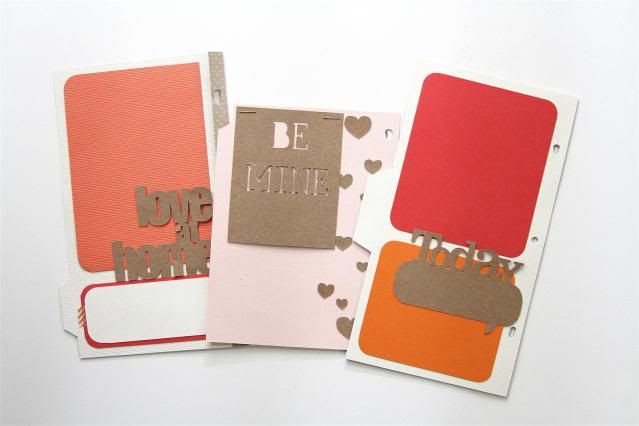
On the back, I added in two coral tones and THIS love at home diecut. I only glued down the home area, so I can slip a photo under it later.
Photobucket
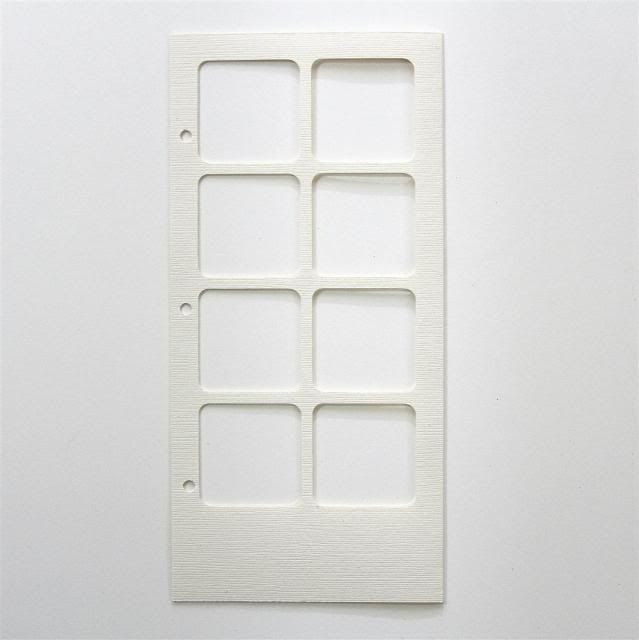
Yesterday I said I would share this page and here it is. It's a 9.5 X 9 inch sheet folded in half, with 12 windows. I simply used my rounded square tool oppition (from the circut or silhouette) and stacked 4 rows of 4, making sure to leave room in the middle for a folding line. I plan to sandwich photos and embellishments here ;)
Photobucket
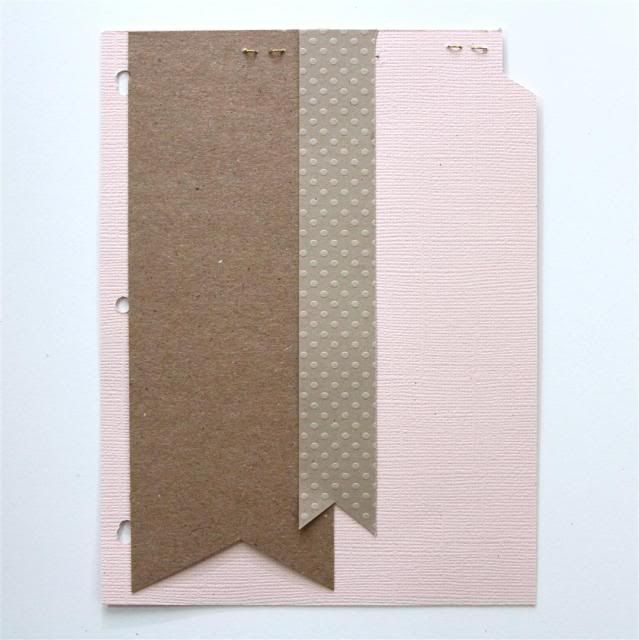
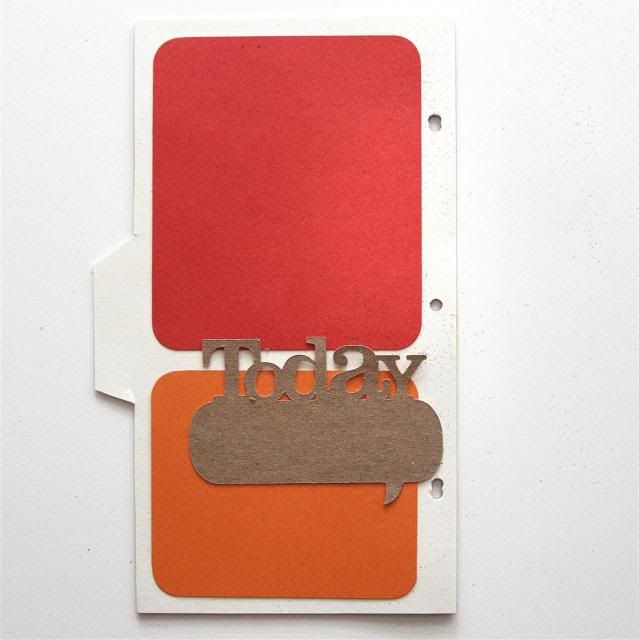
Up next is a simple tag page. I added on two dove tail strips. The paper pretty much says it all....right? :)
Photobucket
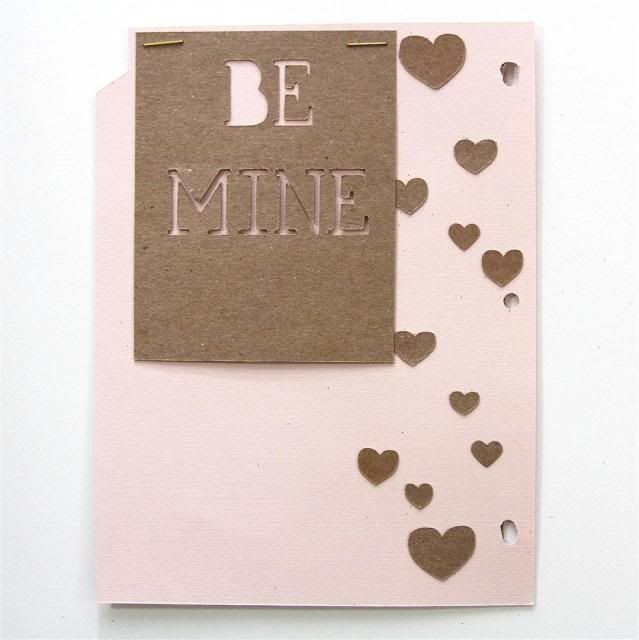
On the backside I added in a "Be Mine" tag and used THIS font. I also glued on different sized hearts. This will be a Valentine's date page for Mr. Sonboul and I...xoxo
Photobucket
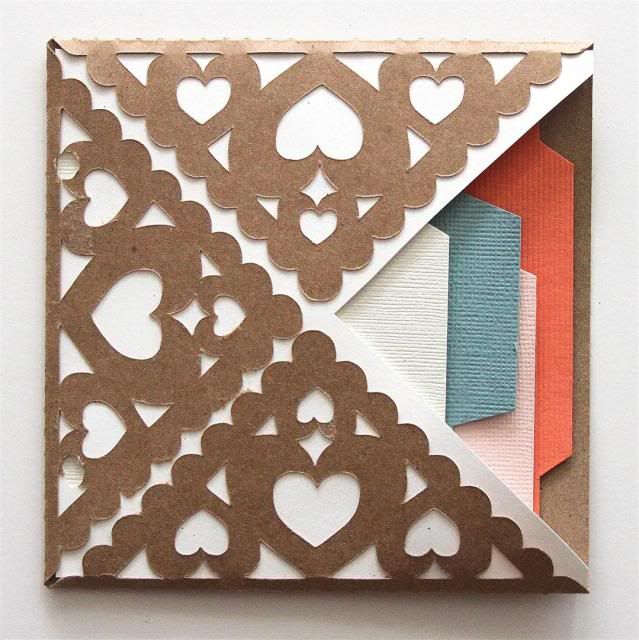
I really like how this next one looks. I wanted to use another envelope and I found this pretty heart envelope. I matted the inside and cut off the 4th flap, that way I could put tags inside it. Ya know, making it into another pocket.
Photobucket Photobucket
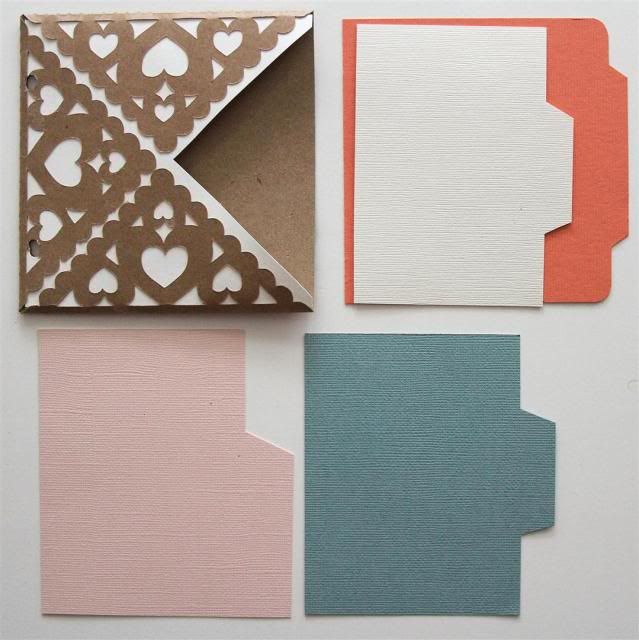
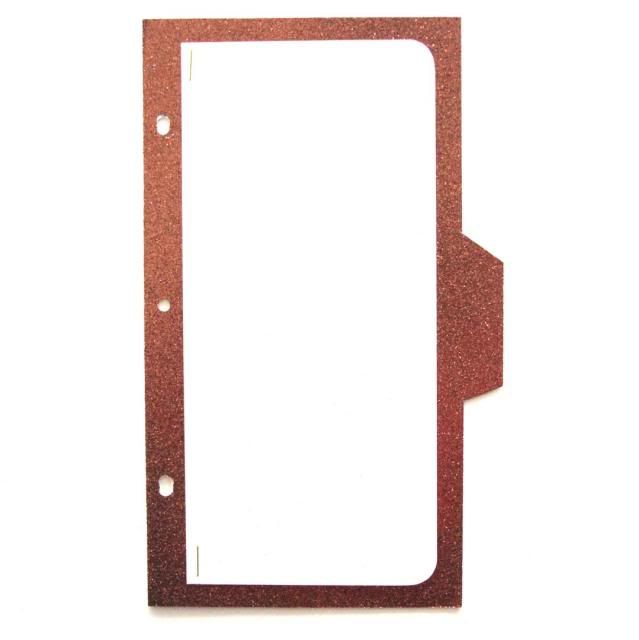
I found this pretty copper glitter paper from Michael's. It's made by their company brand. You won't be able to glue ANYTHING to it, so I stapled on the top sheet.
Photobucket
The backside is colorful and I used THIS journal tag. So cute right?!
Photobucket
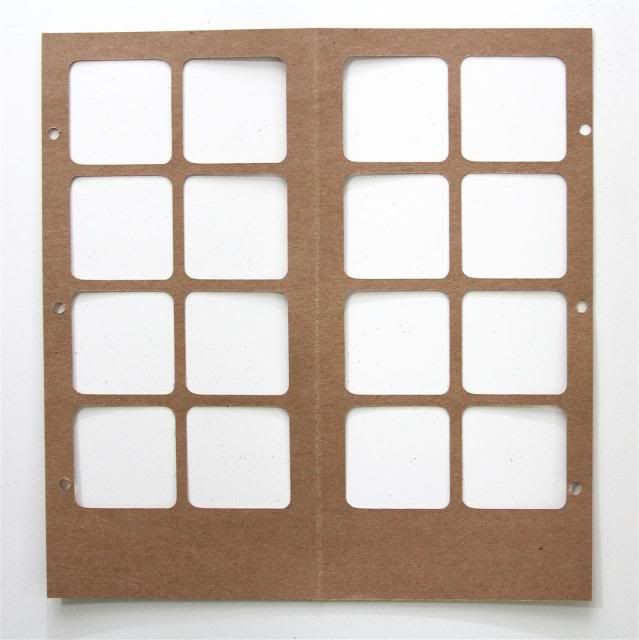
Because this month has less days, you'll need less spots for photos. However, I'm still able to count over 35 photo spots. I'm pretty happy with this months color palette and design. Here are all the fronts:

Photobucket
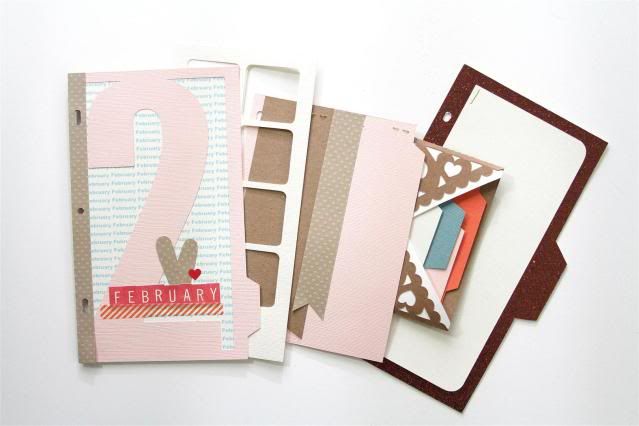
And their behinds ;)
Photobucket

Tomorrow the fun will continue with March, which means more cute pages. Plus a lot more fun links. I hope you enjoyed this month's pages and don't forget to check out my giveaways on the right side bar. You have until Jan 1st to leave a comment. It's for my two new collections.

Pin It!